Google Analytics is a valuable tool that provides insightful data about user interactions on your website. A significant aspect of this data analysis is conversion tracking. Conversion in marketing refers to when a visitor on your website completes a desired action such as purchasing a product, signing up for a newsletter, or filling out a contact form. Tracking these conversions enables businesses to understand what works best for their website and helps them optimize their digital marketing strategies. Here is a step-by-step guide to tracking conversions in Google Analytics.
Step 1: Set Up Google Analytics
If you haven’t already, firstly, you need to set up Google Analytics on your website. This involves creating a Google Analytics account and adding your website as a property. After setting up, you need to copy the tracking code provided and paste it into your website’s HTML.
login-into-google-analytics
Step 2: Define Your Goals
In Google Analytics, conversions are tracked via goals. A goal signifies a completed activity. Navigate to the Admin tab, under which you will find Goals under the View column. Here, you can add new goals or edit existing ones. Define what constitutes a conversion for your business. It could be a product purchase, a completed form, or even time spent on the page.
define-new-goals-in-google-analytics
Step 3: Set Up Goal Details
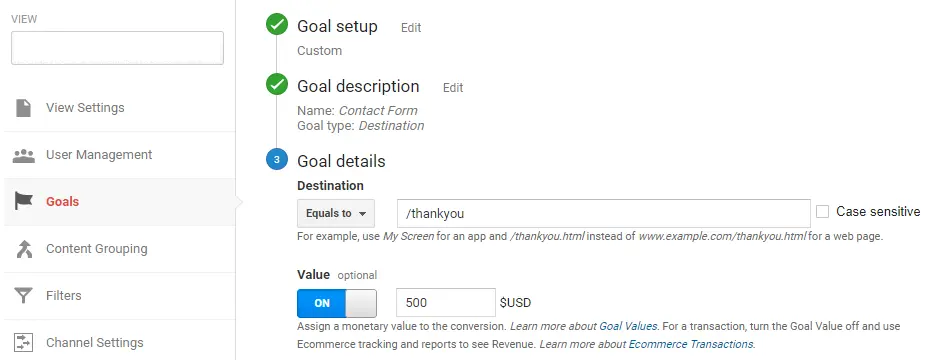
After defining your goal, specify the details. This involves adding the destination URL you want to track. For instance, if it’s a purchase, the destination URL could be the ‘Thank You’ page that appears after a successful transaction.
Step 4: Assign a Monetary Value
If applicable, assign a value to your goals. This could be the actual value of the product purchased or an average value you’d assign to each conversion. This is a valuable feature that enables you to measure the financial gain from your conversions.
add-goal-value-in-google-analytics
Step 5: Enable Ecommerce Tracking
If you run an ecommerce website, enable ecommerce tracking. This provides additional details about purchases such as the products purchased, the transaction details, and the revenue generated.
enable-ecommerce-tracking-in-google-analytics
Step 6: Use Google Ads Linking
If you’re using Google Ads, link it to your Google Analytics account. This provides more detailed data on the ad campaigns driving conversions.
Step 7: Review and Analyze Your Data
After setting up tracking, review the data regularly. The Conversions section in Google Analytics will provide an overview of the conversion data including the number of conversions and the conversion rate.
Summary
Conversion tracking in Google Analytics offers a valuable method of understanding visitor interactions on your website. Whether it’s a purchase, a form filled up, or time spent on a page, each interaction can be tracked, measured, and analyzed to improve your digital marketing effectiveness. Irrespective of whatever action constitutes a conversion for your business, integrating these tracking measures and continually monitoring them, will certainly pave the way for more informed business decision-making and strategy planning.
Free essential resources for success
Discover more from Lifesight


