
Introduction
Deciding to cancel your Shopify subscription might come as a result of various strategic or financial reasons—whether you’re scaling down operations, shifting to a different platform, or simply pausing your business activities. This guide is designed to help you navigate through the process of canceling your Shopify subscription smoothly and effectively, ensuring that you understand each step and its implications.
Step 1: Review Your Current Usage and Needs
Before proceeding with the cancellation, evaluate your current use of Shopify’s services:
- Assess whether the features and costs align with your business needs.
- Consider alternatives within Shopify, such as downgrading to a less expensive plan or using the pause feature if you’re temporarily halting your business.
Step 2: Backup Your Data
Preserve your data to prevent any loss:
- Export important information such as customer data, order history, and product details from the Shopify admin area.
- Use Shopify’s data export features or third-party tools to ensure you have everything saved externally.
Step 3: Resolve Outstanding Financial Obligations
Ensure all invoices and charges are settled:
- Check for any outstanding balances or pending charges that need to be cleared before you can cancel.
- Pay off these balances to avoid any disruptions or penalties.
Step 4: Inform Your Customers and Staff
Communication is key when making significant changes:
- Notify your customers about the closure of your store in advance through emails or announcements on your site.
- Inform your staff and any partners of your decision and discuss any necessary arrangements following the store’s closure.
Step 5: Cancel Any Third-Party Services and Apps
Disconnect and cancel any associated services:
- Review and cancel any subscriptions for third-party apps that integrate with your Shopify store.
- Ensure that you are not billed after the store has been closed by properly uninstalling and deactivating these services.
Step 6: Access the Cancellation Page
Navigate through the Shopify admin panel:
- Log into your Shopify admin.
- Go to ‘Settings’ and then ‘Account.’
- Under the ‘Account’ section, find the option to cancel your subscription.
Or you can ask for help by directly contacting Shopify’s help center page.
Step 7: Follow the Cancellation Process
Complete the process with care:
- Read all the information provided by Shopify regarding the cancellation process.
- Follow the steps prompted by Shopify, which will likely include confirming your intent to cancel.
shopify_subscription_1x.webp 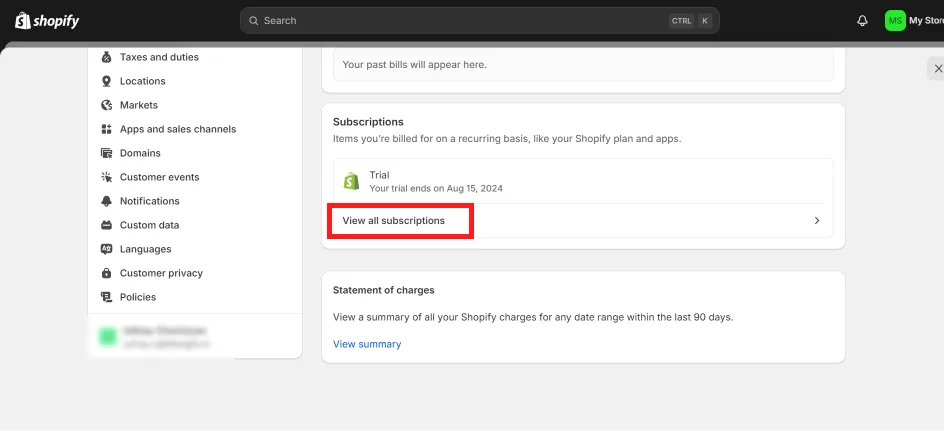
Step 8: Confirm Cancellation and Follow Up
Ensure everything is finalized:
- After completing the cancellation process, check your email for a confirmation from Shopify.
- Follow up on any unresolved issues or final steps suggested in the cancellation confirmation.
cancel_shopify_subscription_1x.webp 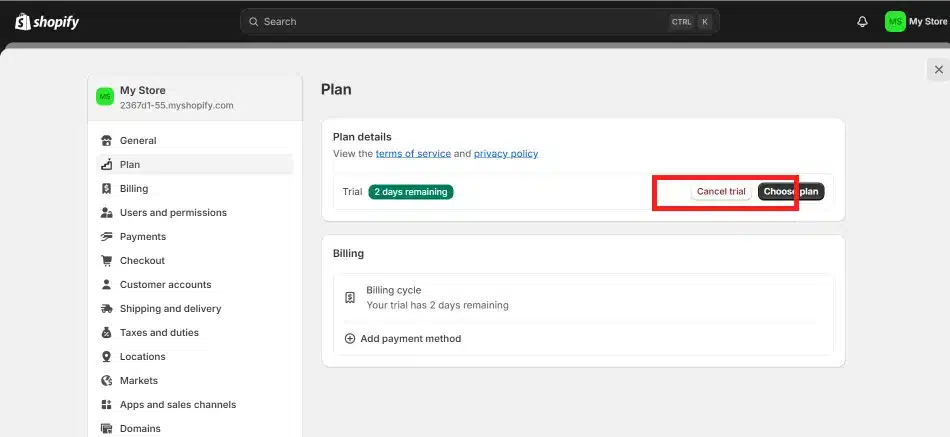
Summary
Canceling your Shopify subscription involves a series of thoughtful steps to ensure that your business transitions smoothly without unexpected disruptions. From backing up your data to settling financial obligations and formally completing the cancellation process, each step is crucial. After canceling, it’s important to keep records of the confirmation and monitor any subsequent issues or requirements as per Shopify’s guidelines.
Free essential resources for success

Discover more from Lifesight


