With the growing demands for rich and dynamic data analysis, Google has introduced Google Analytics 4 (GA4), a more advanced tracking system that offers powerful insights into user interactions. GA4 has new features and provides a more holistic view of the customer journey across multiple platforms and devices. If you’re ready for this upgrade, this guide presents a step-by-step process on how to migrate to GA4 smoothly.
Step 1: Set Up a New GA4 Property
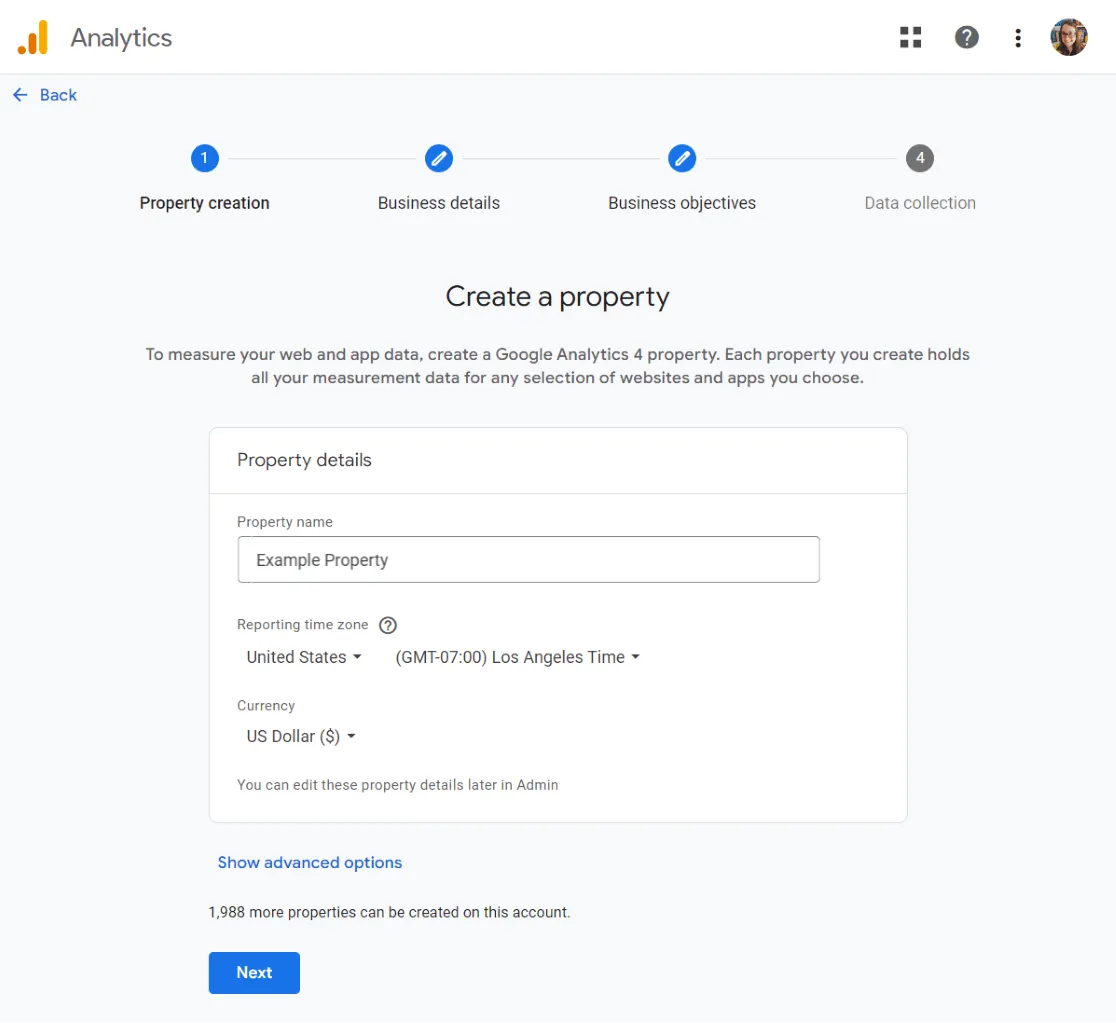
Begin by logging into your Google Analytics account. Click on ‘Admin’ in the left-hand menu and select the account you want to migrate. In the Property column, select the property that currently collects data and click on ‘GA4 Setup Assistant’ under it. Select ‘Get Started’ under the ‘I need to create a new GA4 property’ option. After you choose ‘create property’, give your property a name and set the correct reporting time zone and currency, then click ‘next’ to continue.
setup-a-new-ga4-property
Step 2: Implement GA4 and Universal Analytics Simultaneously
It is advisable to run both Universal Analytics and GA4 properties simultaneously because GA4 doesn’t import historical data. Plus, GA4 may still be lacking some features that you may frequently use in Universal Analytics.
Step 3: Configure Your Data Stream
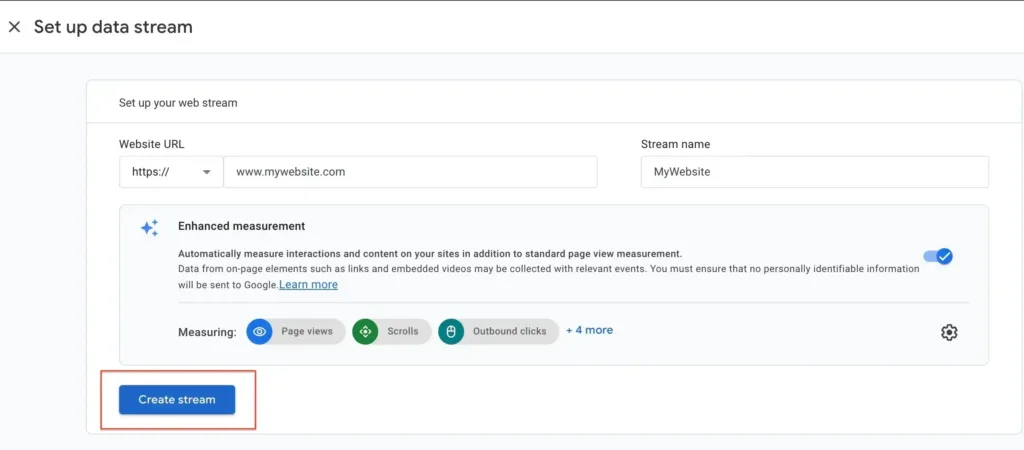
Almost every user interaction in GA4 is event-based. To track these interactions, we need to set up data streams. Select ‘Data Streams’ in the GA4 property column. Choose ‘Web’ Click on ‘Add Stream’ and insert your website URL with the stream name.
Step 4: Properly Configure Events
GA4 relies heavily on events, which describe the interactions of the user with your site or app. Configuring your event measurement strategy is critical for GA4.
Step 5: Configure Ecommerce Tracking
Enable Ecommerce tracking to see how users interact with your ecommerce platform. Go to ‘Ecommerce & Conversions’ in the settings and toggle on ‘Ecommerce.’
enable-ecommerce-tracking-in-google-analytics
Step 6: Set Up Conversions
Conversions help you understand how much value your site or app provides for your business. Ensure you set up conversions in GA4 to track critical data like purchase demographics and funnel drop-offs.
setup-conversion-tracking-in-google-analytics
Step 7: Familiarize with the New Reporting
GA4 has new reporting structures. Go through dashboards, acquisition, engagement, and monetization reports to understand the new system.
Summary:
The migration to GA4 is a paradigm shift that could change the way we understand our websites’ and apps’ user interactions. It can feel complex, but with patience and thorough understanding, GA4 can provide meaningful and insightful data into the customer journey. As with any new tool, familiarize yourself with the new features and interfaces to harness its full potential.
Free essential resources for success
Discover more from Lifesight


